

Up until 2 weeks ago, our hall bathroom was in the 90% finished club. I had painstakingly painted the floors, the walls, the vanity. I swapped out the mirror, the lighting, and hardware. I also did a super cool recessed modern medicine cabinet. (Future post of bathroom before & after’s and cost breakdown coming soon!)
One thing that just sat for a long long time was the linen closet area. Within the first month of owning the house, I removed the bifold doors of the linen closet. The doors disabled any functional flow to the bathroom because you cannot open the linen closet doors if the bathroom door is open, and it really made the bathroom look a lot smaller because you no longer see the depth of the space.
The house originally came with these metal wire shelving that are super popular. For me, I really disliked the look and functionality of the metal shelves. With the wide slots between the wires, stuff fall between the cracks all the time. I knew I wanted to do a wooden floating shelf, and I wanted this to be very budget friendly, so I set out to design the perfect, easy, DIY floating shelves.

It took a bit of trial and error, and sitting on it for months for me to figure out how to finish them so that they would not only look good, but also be sturdy and functional.
Materials:
- 1×2
- 1/4″x3″ hobby project strips
- 1/4″ plywood underlayment
- 3/4″ sanded plywood
- Screws and wall anchors
- Nails
- Wood filler
- Wood glue (optional)
Tools:
- Circular saw
- Nail gun
- Drill
- Driver
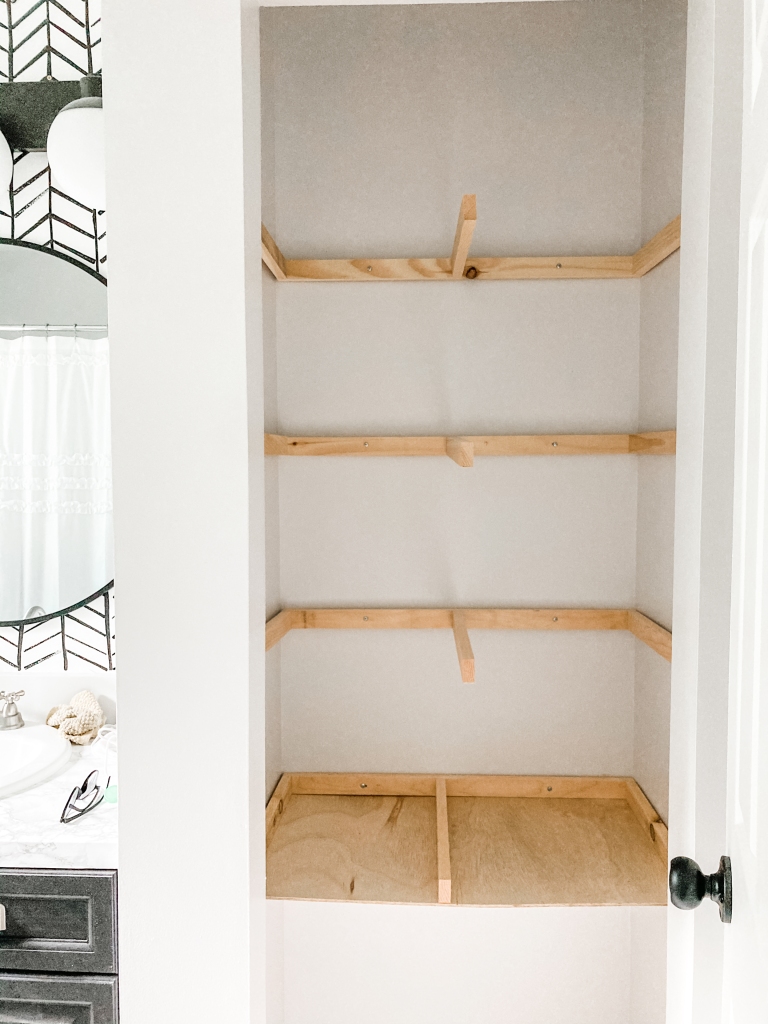
First, I decided on how many shelves I wanted. The closet originally came with 4, and I decided to keep 4 and have it around the same height that the original shelves came with. Next, I measured out how big my shelves would be, and made a materials list. I decided to use 1×2’s as my supports. I first measured out the width and depth of my closet and cut 1×2’s to length. Before screwing into the wall, I attached a middle support to the back piece. Then, I screwed them in using 2″ screws and anchors where there were no studs. The supports right now should all look like the letter E.
Then I cut out the 1/4″ plywood and 3/4″ plywood to the dimension of the closet. I made sure I had all 4 shelves all cut and ready to go. The working from the bottom, I first attached the 1/4″ plywood to the bottom of the shelves and using wood glue and nails to adhere. The wood glue is really optional, and I only used it for the bottom 1/4″ plywood. Before attaching the top 3/4″ plywood, I cut two 1×2 pieces to length to fit between the gaps of my E. This helps create more structure in the front of the shelf. You could use pocket holes to attach this to the structure, but I just used my nail gun to nail it in to the E’s. Now, your bottom structure should look more like a 8. Then I popped the 3/4″ plywood on top, and nailed it in. I repeated the same steps to shelves 2-4, again working from the bottom to the top.
I should note the reason why I didn’t add the front supports until assembly was because I realized it would be impossible to slide large sheets of plywood in otherwise. The openness of the E structures allowed me to slide my plywood pieces in with ease. Also finishing one shelf at a time also helped with ease of assembly.
When it was finished, I contemplated on if I wanted to stain it a darker color. But lately, I’ve been really loving the lighter wood tones, so I decided to just add a simply polycrylic finish on top.
I’m happy to say the hall bath is now in the 100% done club. At least for now. At some point, we might do a full gut job, or switch things up. But I’m really happy with the way it turned out!
